ShopDreamUp AI ArtDreamUp
Deviation Actions

I love your artworks (PG) Gallery
This tier is for all those of you that have loved and nurtured my creativity over the past 19 years... with your warmth, comments and feedback.
$3/month


Suggested Deviants


Suggested Collections


You Might Like…


Featured in Groups


Description
So you decide it is finally time to get some ink.
But how to get it done in a realistic way?
In this tutorial I will be using photoshop, but I am sure there are similar options in other paint programs.
I will also be assuming some basic photoshop skills, so I won't go into details where the filters, or layer controls are.
The first thing to remember is that tattoo's are actually sub-dermal artwork (under the skin), so the colours will end up being somewhat translucent, and taking the overtones of the skin.
So we cannot simply lay a graphic on top of the skin and have it look like a tattoo.
So what I am going to show here is one technique I use to get fairly natural looking tattoos.
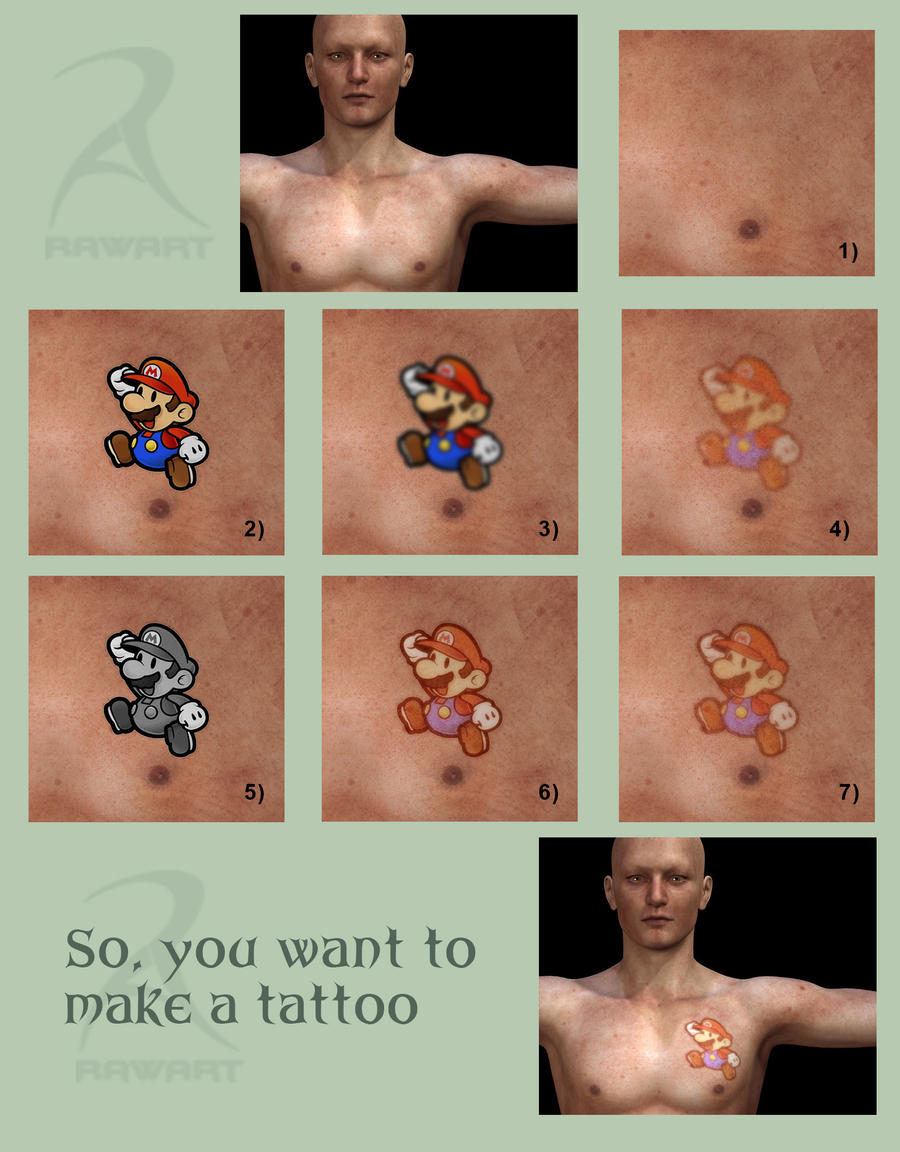
I am going to start off with a base texture that has alot of texture to it, it has wrinkles, spots and various kinds of discolourations. I choose this one because it will show off more clearly how the skin details will show through the art.
1) So first we will open up our skin texture (for this I choose the torso).
2) Then we place the artwork which we want to use on a layer on top of the skin.
Duplicate that layer with the art a couple of times (we will need two layers to make our tattoo, but I would make one extra with the original artwork, just in case we need it again later)
Turn off the visibility of all but the lowest layer of art. This is the layer we will start with, so make it the active layer.
3) Tattoo ink always has a slight "bleed" under the skin, giving it a softer edge. So on this layer we will give the art a relatively soft Gaussian Blur
(see image). Dont worry about the details of your artwork, we will bring them back later with the other layers, this one is simply to give that soft sub-dermal look to the art.
4) Then after the blur, we will set the layer to "soft light" by adjusting your layer attributes (in your layers toolbox). This will really make the image blend nicely into the skin.
5) Now lets turn on the layer of art that is on top of this one, and desaturate the image. The reason we are desaturating is because we want to sharpen the details of the artwork, but we do not want the colours to become over saturated. So working with a greyscale version will let us sharpen things but not introduce more colour to the mix.
6) Then we will also set this layer to "softlight", and you can see how the details jump back to life. But this is a little too sharp for my liking, so we then can adjust our "opacity" on this layer and bring it down to what will look more natural.
7) I brought it down to 40% opacity, and think this will suit the image I am working with.
Then you should have a very realistic looking tattoo for your figure.
This is just one technique, but it should work for most types of situations.
Hope you enjoy Smile
Rawn
But how to get it done in a realistic way?
In this tutorial I will be using photoshop, but I am sure there are similar options in other paint programs.
I will also be assuming some basic photoshop skills, so I won't go into details where the filters, or layer controls are.
The first thing to remember is that tattoo's are actually sub-dermal artwork (under the skin), so the colours will end up being somewhat translucent, and taking the overtones of the skin.
So we cannot simply lay a graphic on top of the skin and have it look like a tattoo.
So what I am going to show here is one technique I use to get fairly natural looking tattoos.
I am going to start off with a base texture that has alot of texture to it, it has wrinkles, spots and various kinds of discolourations. I choose this one because it will show off more clearly how the skin details will show through the art.
1) So first we will open up our skin texture (for this I choose the torso).
2) Then we place the artwork which we want to use on a layer on top of the skin.
Duplicate that layer with the art a couple of times (we will need two layers to make our tattoo, but I would make one extra with the original artwork, just in case we need it again later)
Turn off the visibility of all but the lowest layer of art. This is the layer we will start with, so make it the active layer.
3) Tattoo ink always has a slight "bleed" under the skin, giving it a softer edge. So on this layer we will give the art a relatively soft Gaussian Blur
(see image). Dont worry about the details of your artwork, we will bring them back later with the other layers, this one is simply to give that soft sub-dermal look to the art.
4) Then after the blur, we will set the layer to "soft light" by adjusting your layer attributes (in your layers toolbox). This will really make the image blend nicely into the skin.
5) Now lets turn on the layer of art that is on top of this one, and desaturate the image. The reason we are desaturating is because we want to sharpen the details of the artwork, but we do not want the colours to become over saturated. So working with a greyscale version will let us sharpen things but not introduce more colour to the mix.
6) Then we will also set this layer to "softlight", and you can see how the details jump back to life. But this is a little too sharp for my liking, so we then can adjust our "opacity" on this layer and bring it down to what will look more natural.
7) I brought it down to 40% opacity, and think this will suit the image I am working with.
Then you should have a very realistic looking tattoo for your figure.
This is just one technique, but it should work for most types of situations.
Hope you enjoy Smile
Rawn
Image size
1600x2047px 940.97 KB
© 2012 - 2024 RawArt3d
Comments33
Join the community to add your comment. Already a deviant? Log In
Thank you so much! I just started tattoo making and those tips are invaluable to make it look realistic ")